
Digital mixers use parametric equalizers - which is a god-send for those who are used to a graphic equalizer with an analog system. Parametric EQ allows for so much more flexibility.
Considering it is one of the most popular digital mixers in churches today, I will use the Behringer X32 for all visuals in this post. However, the principles will translate to most digital mixers.
There are several different types (or modes) of EQ available with a parametric equalizer:
The ‘gain' and ‘frequency’ knobs are exactly what you would expect them to be. Gain controls how much you cut or boost the frequency while the frequency knob allows you to choose which frequency to target.
The ‘Q’ is a bit more mysterious. It is only available when using peaking filters (PEQ) and allows you to set the bandwidth of frequencies to be affected. The lower the Q value, the more frequencies are affected. On the other hand, higher Q values affect fewer frequencies.
Prior to digital mixing, 31-band graphic equalizers were the best way to dial in your sound. To help give some perspective, a Q value of 4.3 will give you the same result of adjusting one of the knobs on a 31-band graphic EQ.
Therefore, in most cases, I find it best to start with the Q value at 4. This starts the process at a place most people are familiar with, especially if you transitioned from analog to digital mixing. Then, the goal is to find the most narrow bandwidth (higher Q value) that achieves the desired result. After all, there is no reason to cut out neighboring frequencies if you don’t have to.
Keep in mind, there is no one-size-fits-all approach to frequency problems. All I can give you is a starting point and then you have to dial it in from there.
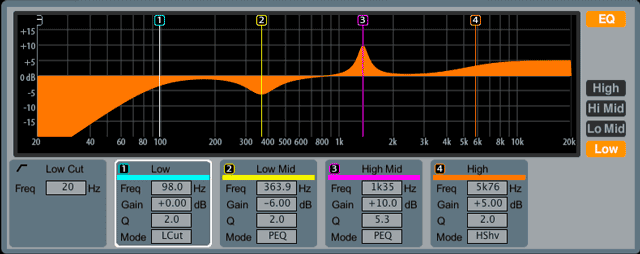
Let’s say you have a feedback problem on one of your vocal mics and find that the problem is at 600Hz. The fix here is a peaking filter (PEQ) starting with the following settings:
You may need to cut more (lower gain) to get rid of the feedback problem or you may need a wider frequency band (lower Q value) to get the job done. The goal is to find the most narrow bandwidth (highest Q value) along with the least amount of gain cut that still solves the problem.
Every vocal mic should have a low cut filter. When using a low cut filter, you do not have to worry about the Q value or gain - the frequency placement is the only option available. I recommend starting at 100Hz and increasing until the vocal sounds too thin. Then, dial it back a bit.
Currently, I have the low cut filter set around 220Hz on vocals at our church. Our room reverberates terribly around 250Hz, so this cleans up the muddiness without making them sound too thin. Keep in mind, your situation is probably different, so like I said above, start at 100Hz and go from there.
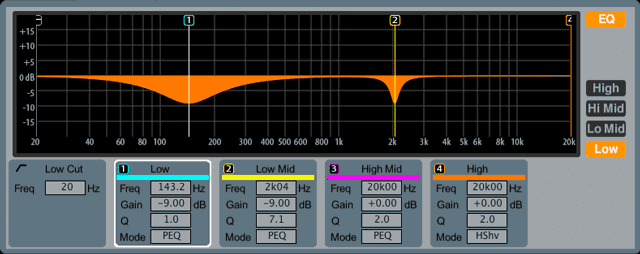
There are times when you need to bring a vocal or instrument up in the mix but when you do, it is irritating to the ear. Then, you bring it down and it gets lost. This is the sign of a frequency problem.
To fix it, use a peaking filter (PEQ), start with your Q value at 4 and set your gain to +6dB. Then, sweep through the frequency spectrum slowly until you find the irritating frequency range. Then, cut the gain to about -3dB. If this fixes the problem, awesome! However, you will most likely need to dial it in even more, experimenting with the Q and gain values.
Trial and error is the best way to get good at EQ. The purpose of this post is to help form a foundation, and now it’s your turn to build the house. Don’t be afraid - dive in and try some things. At first, most of them won’t work and you will get frustrated. But, keep at it. Eventually you will get to a point where you can hear the problematic frequency range before you even go searching for it.


Hi Kade,
Do you have any resources about EQ'ing drums? I went in and made a bit of adjustment to the vocal mics by using your vocal EQ cheat sheet, thanks! We have the exact same board (Behringer X32 + the P16's).
Also, I can't figure out how to use the talk-back mic.
We have a mostly older crowd currently and many have complained in the past about it being too loud. We recently put the drums in a cage (plexi with clarisonic panels) and this has helped a bit. I think the actual problem is with EQ. It seems the sanctuary really picks up lower frequencies.
Any input/advice you can give is greatly appreciated!
Hey Amy - I currently do not have any resources for EQ'ing drums but I did find this: http://www.audio-issues.com/music-mixing/drum-eq-guide/.
On the talkback mic, press the 'view' button at the bottom of the talkback mic section on the X32. Then, on the display you can page over to Talkback A and Talkback B to assign which outputs the talkbackback mic should be sent to. Then, just hold down the talkback button and talk away. The built-in microphone is right under the display.
For problems with loudness, check out this post: A Better Way to Measure Loudness. I think you will find it helpful.
how do i set the Q?
What mixer are you using, Elvis?
Hi Kade,
I’ve been looking for an EQ app for my team to practice with, do you have any recommendations?
Rox
Check out the Great Church Sound app: https://www.greatchurchsound.com/mobile-app.html
You mentioned about your room reverberating terribly around 250Hz in this post and my question is that how were you able to measure the reverberation of your room please?
Easiest way is with a process called EQing Your Room. Here's how: https://collaborateworship.com/tune-eq-room-x32/
Kade,
Will you be releasing a similar set of "how tos" for the A&H SQ series.
We have a sound team of relative newbies that really need this kind of training.
Yes! It is on our 2024 project calendar to create videos specific to the SQ.