

So you are one of the lucky chosen to fulfill six months of CCLI reporting…congratulations! Truth is, it happens to all of us who hold a CCLI license, once every 2.5 years.
I don’t know about you, but I generally don’t get too excited when the letter comes in the mail that it is time to report. Actually, it is more like a sigh and 'roll your eyes' type of moment.
Luckily, I have found that six months of reporting can be done in one sitting. There is no need to log on and report every week, you can simply log on at the end of the six months and report for the entire period at once.
Note: This post assumes that you are using Planning Center. If you are not using Planning Center, it is time to check it out!
The letter CCLI sent asking you to report outlines your reporting period. You may assume that this is something you have to do every week, but you can save yourself some time and wait until the end of the reporting period and do it all at once.
I recommend setting a reminder in your calendar so you don’t forget about it altogether.
Once you have reached the end of your reporting period, it is time to fulfill your CCLI reporting duties. First, log in to Planning Center and run the CCLI report. To do this, navigate to the Songs tab, hover over ‘Reports’ and click ‘CCLI Copy Report’.
If there is no ‘CCLI Copy Report’ option, you need to activate CCLI reporting at planningcenteronline.com/organization. Then you will be able to access the report.
Set the date range to your CCLI reporting period (total of 6 months) and click Accept.
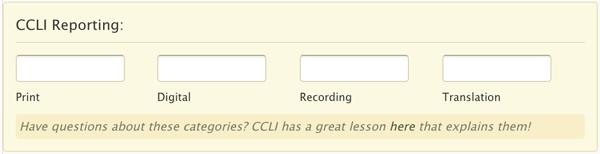
Now, open a new tab in your browser and log in to CCLI Reporting (olr.ccli.com).
Use the search bar to add each song from your Planning Center report in to CCLI. Tip: It is much faster to search by CCLI number, if available.
For ‘Print, Digital, Recording, and Translation’, you need to enter the per-week data. For example, at my church we report 1 print and 2 digital for every song. This is because we provide one arrangement of the song for print (1 print) and two digital events (files sent via Planning Center, lyrics in ProPresenter).
Unsure what to report? Check out this CCLI support article.
If you have been filling out the CCLI section in Planning Center each time you schedule a song, the numbers in your Planning Center report are totals from the past six months. You want to ignore these numbers and only input what the data would be for one scheduled service, not six months worth of services. If you are unsure what this number should be, simply divide the number by the ‘Number of plans use in’.
In my situation, each song has the same reporting data (1 print, 2 digital). In other words, I provide one printed version and two digital files (files sent via Planning Center, lyrics in ProPresenter) for each song. Since the data is the same for every song, I do not waste time filling out this section in Planning Center every week.
On your Planning Center Report, there is a column titled 'Number of plans used in’. If the song has a number higher than 1, you will need to record each additional instance in CCLI.
To do this, navigate to the Report Activity page. Then, click the + icon next to the song you need to modify, and click the ‘Add to Report’ button to create multiple instances of this song.
Example: My Planning Center report shows that ‘Your Name Brings Healing to Me’ was in 3 different plans over the past six months. So, I used the ‘Add to Report’ button to create two additional instances of that song, with the same data each instance.
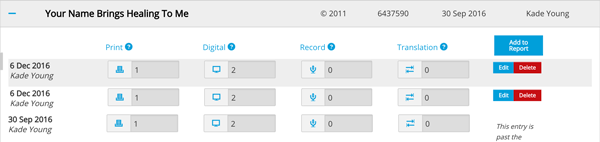
Note: The date in the left column does not have to correlate with the date the song was actually scheduled. This is simply the date you added the song to your report. CCLI does not care to know the specific date you scheduled the song.
Once everything is entered, click the ‘Done Reporting’ button at the bottom right of your screen.
Congrats! You just completed six months of CCLI reporting in one sitting. Now, go do something fun and meaningful with all the time you saved.


Thank you my brother, for this helpful article. This will be much simpler than how I have done this reporting in the past. I have marked the date in my schedule book, as you suggested. On Monday, October 1, I will do 6 months of reporting!
Glad it helped, Eric! Batch reporting is definitely the way to go.
Kade,
Our reporting period just closed yesterday and I am wondering how long I have to complete our reporting to CCLI. I called them, but have been on hold for over an hour. I decided to look online, but am not finding the answer to my question. I did however find your helpful article. Thanks.
Hey Heidi - hopefully you were able to get ahold of CCLI. I don't know how long you have, but I don't imagine they would reject your reporting even if late.